
My mother weighs 128 pounds. I am 71. And for about six months after she came home from the hospital, I was lifting and guiding her through every transfer with my hands wrapped around her forearms and my back rounding forward like a question mark. Nobody told me there was a better way. I pulled my lower back twice. She grabbed my wrist so hard she left bruises. We were both terrified every single time.
A gait belt changes all of that. It gives you a stable, controlled handhold at the center of the patient's gravity, not at the wrist or the armpit. It lets you keep your back straight. And it gives the person you are helping something to push against rather than grabbing at you. But the belt only works if you put it on correctly and use the right technique. Done wrong, a gait belt is uncomfortable and still risky. Done right, it makes transfers feel almost routine. This guide walks you through exactly how to do it right, using the LiftAid Transfer and Gait Belt, which is the one I use every day.
If you are still doing transfers without a gait belt, you are taking a risk you do not have to take.
The LiftAid Transfer and Gait Belt has a metal buckle, a secondary safety loop, and 60 inches of length for larger patients. It costs less than a decent lunch. Check today's price on Amazon before you read any further.
Amazon Check Today's Price on Amazon →Before You Start: What You Need to Know About Belt Safety
A gait belt is not a lifting strap. You are not going to hoist your mother off the chair with it. What you are doing is guiding her, stabilizing her, and giving her something firm to push against while she does most of the work herself. The difference matters because it changes how you approach every transfer. Your job is to steady and redirect, not to carry.
Also know this: a gait belt is not appropriate if the person has abdominal wounds, abdominal surgery within the last few weeks, a colostomy bag, or a pacemaker near the belt line. If any of those apply, check with their physical therapist or doctor before using one. For most older adults recovering from a fall, a hip replacement, or general deconditioning, a gait belt is exactly the right tool.
Step 1: Put the Belt Over Clothing, Never on Bare Skin
This is the single rule that most people get wrong the first time. The belt goes over a layer of clothing, not against skin. A canvas or nylon belt dragging against bare skin during a transfer can cause friction burns, especially on thin, older skin. If your parent or patient is in a hospital gown or a light robe, make sure there is at least a thin layer of fabric between their skin and the belt. A t-shirt, a pajama top, a cardigan, any of those work.
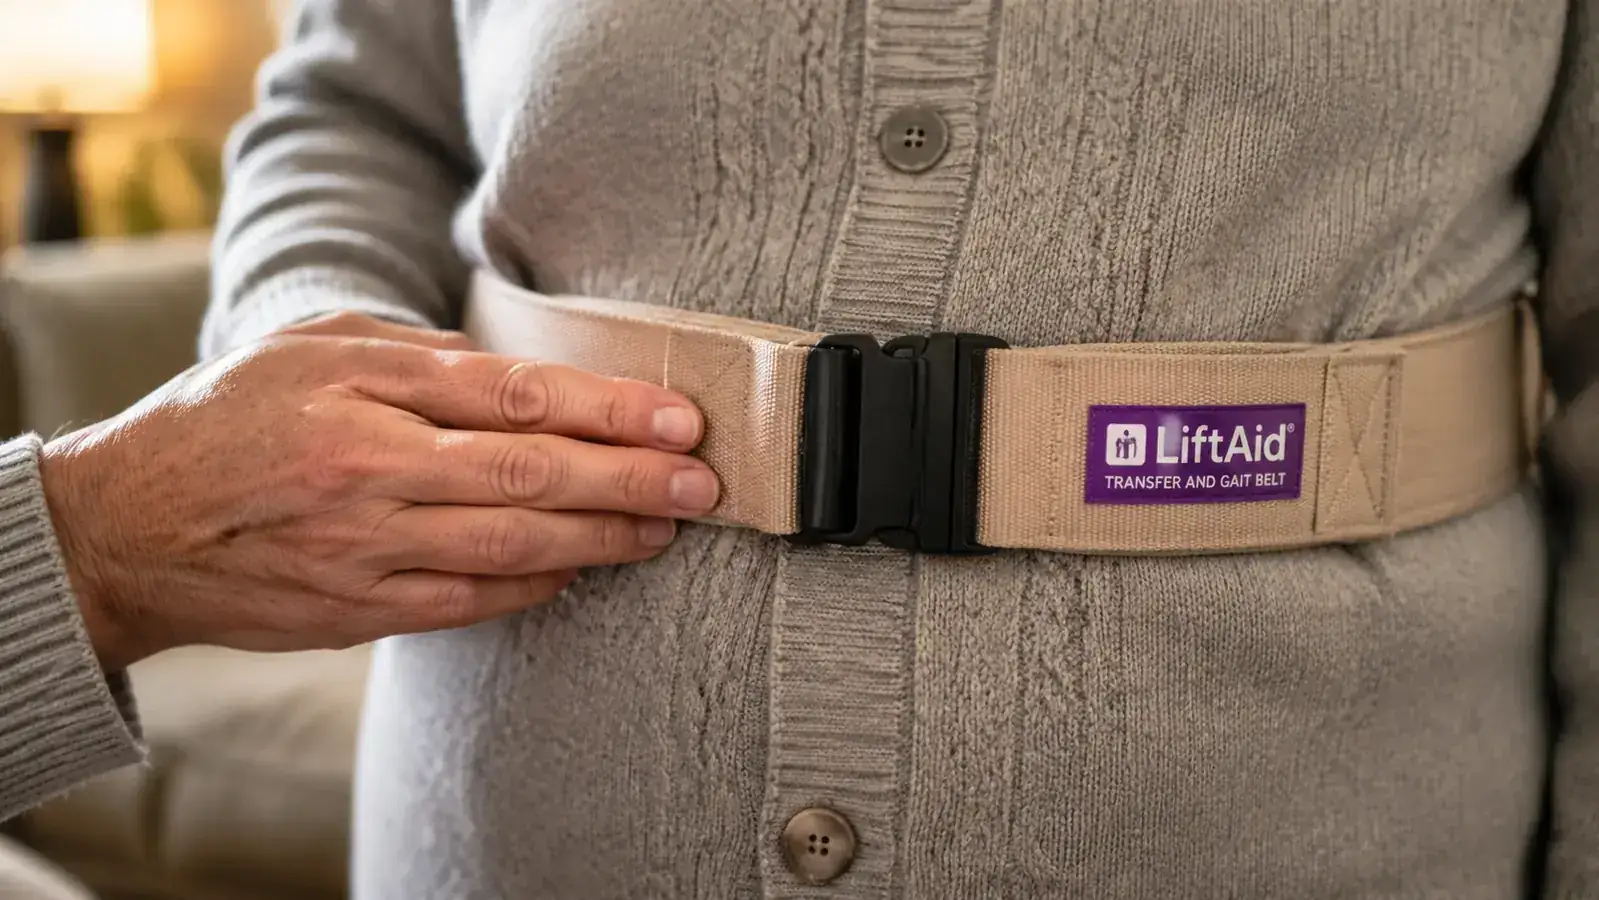
Lay the belt flat against the clothing at the front, thread it through the buckle, and pull it snug. The buckle should sit at the front center of the body, roughly at the belly button. Do not let it slide around to the side or the back where you cannot see it and where it can dig into the hip.
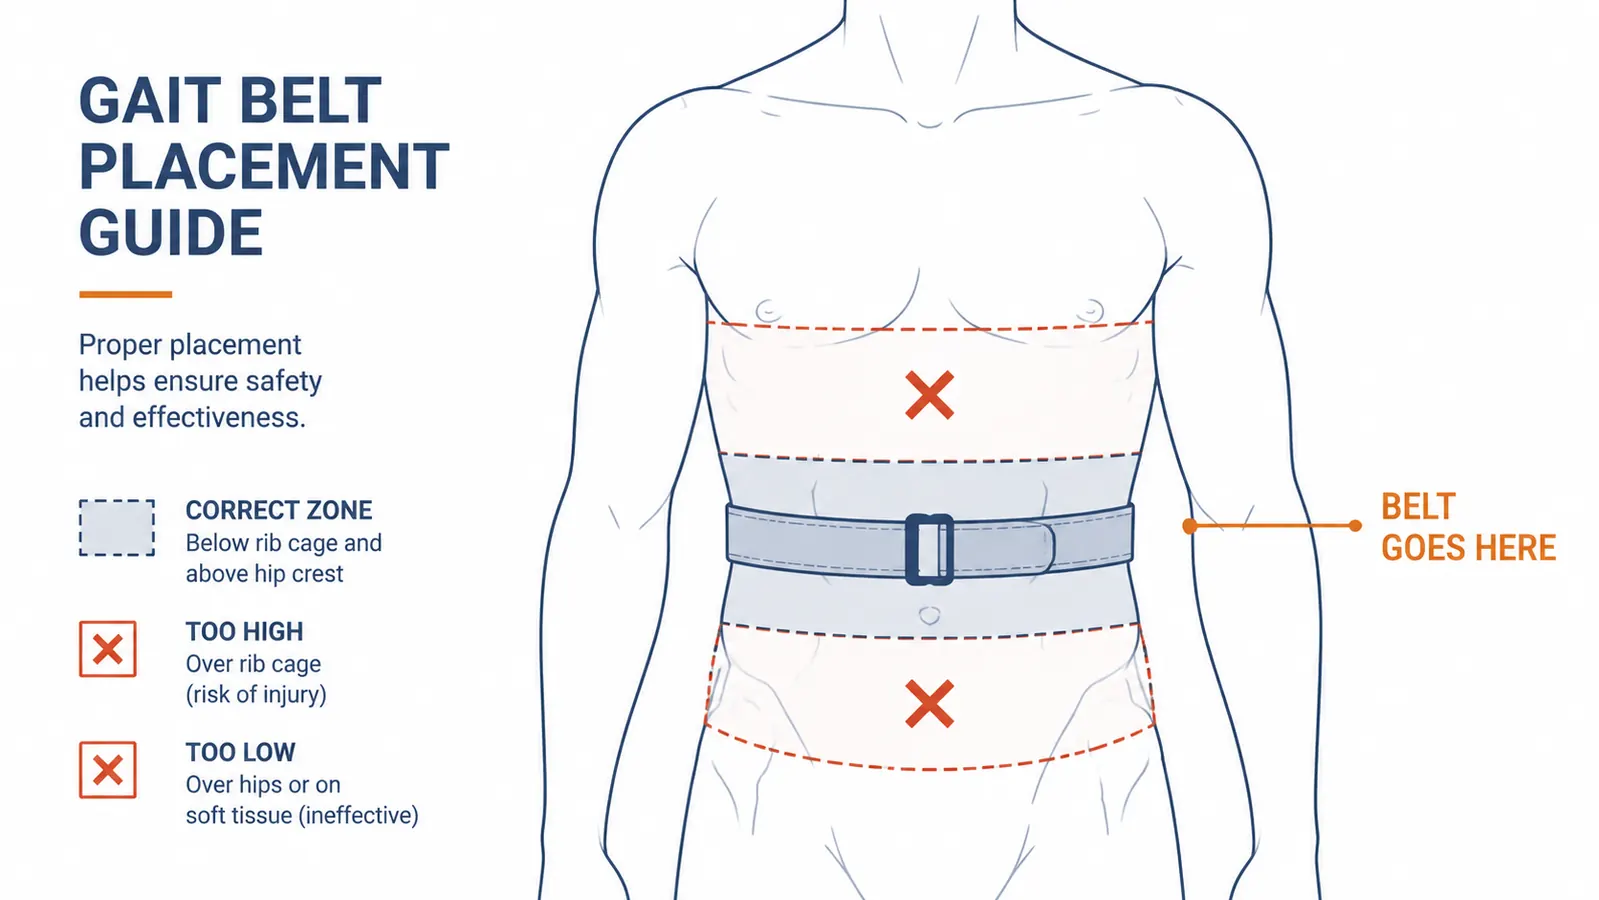
Step 2: Position the Buckle Below the Rib Cage
Once the belt is on, slide it so the body of the belt sits in the zone between the bottom of the rib cage and the top of the hip bone. That band of soft tissue is the natural transfer zone. Too high and the belt puts pressure on the lower ribs, which is uncomfortable and can be dangerous if the patient has any rib issues. Too low and it slides down over the hip bones during the transfer and becomes useless.
Check the fit before every transfer. Slip two fingers under the belt on the front side. You should be able to slide them in with light resistance. If your whole hand goes in without resistance, tighten it. If you cannot get two fingers under at all, loosen it one notch. The belt should be snug enough that it cannot ride up or spin but not so tight that it is squeezing. A properly fitted belt should feel firm, not punishing.
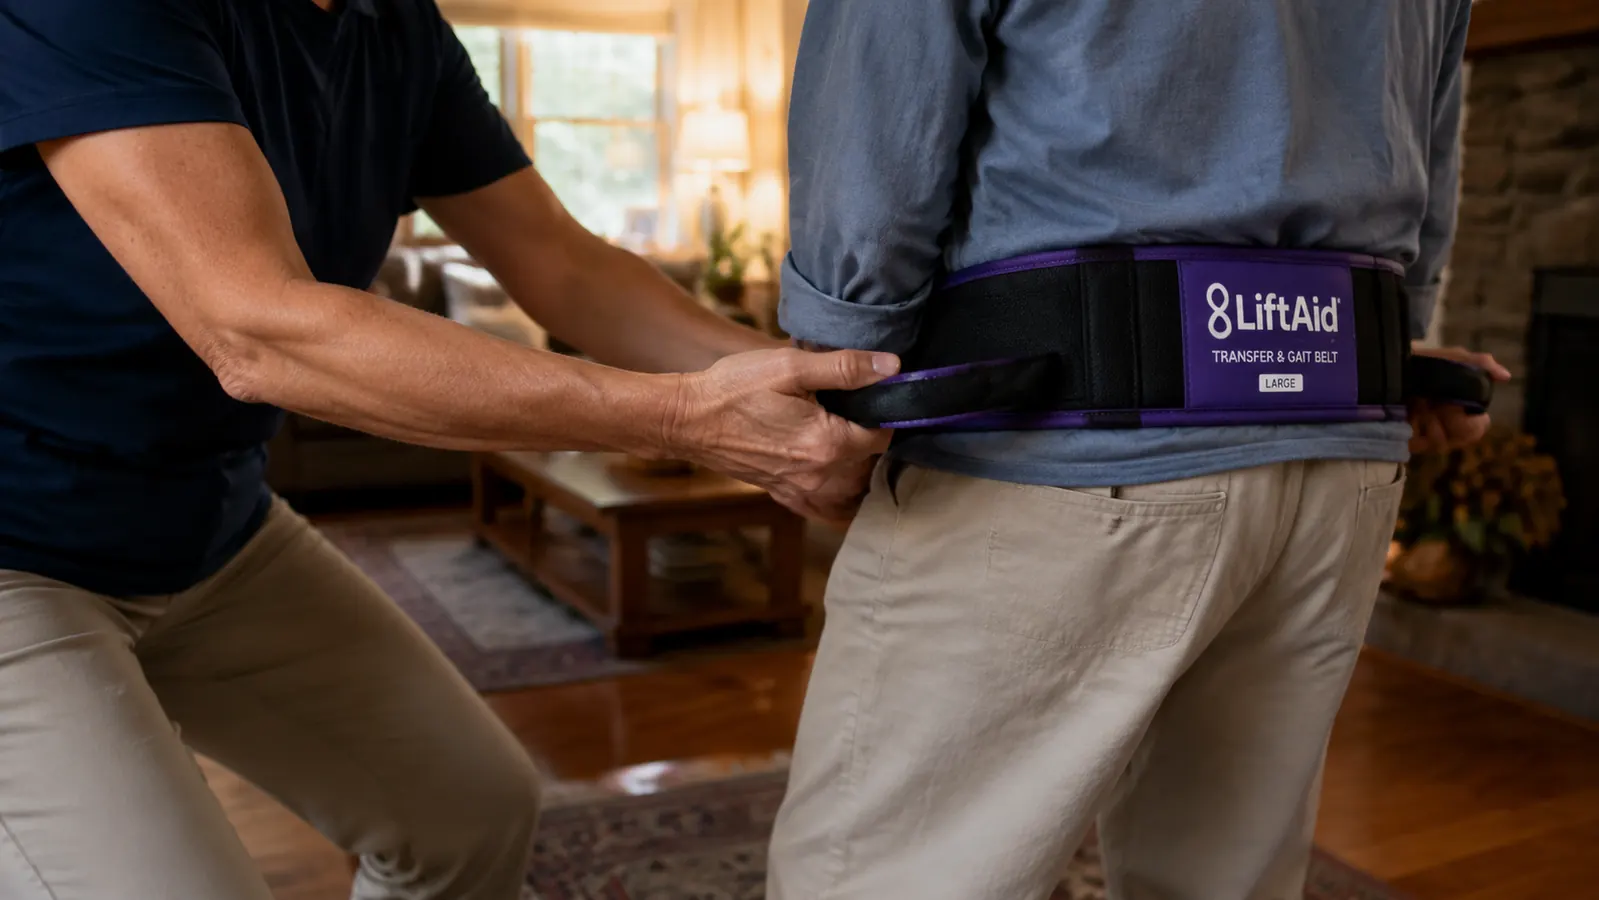
Step 3: Use the Underhand Grip, Not the Overhand
Most people grab a gait belt overhand, like picking up a suitcase. That puts your wrists in a weak position and your elbows flared out, and it forces you to pull up with your upper back and shoulders. Instead, grip from underneath with your palms facing up. Slide your fingers under the belt on either side of the patient, roughly at the side seams of their clothing. This is the underhand grip.
With the underhand grip, your elbows stay close to your body, your biceps do the work, and your lower back stays tall and neutral. Your forearms rotate naturally through the transfer motion rather than torquing at the wrist. If the patient starts to go down, you can lower them safely because the angle of your grip still gives you control. The LiftAid belt has reinforced loops at the sides specifically designed for this position. Use them.
Most caregiver back injuries during transfers happen in the first half-second, before either person realizes something is going wrong. The right grip and bent knees are the only things that protect you in that moment.
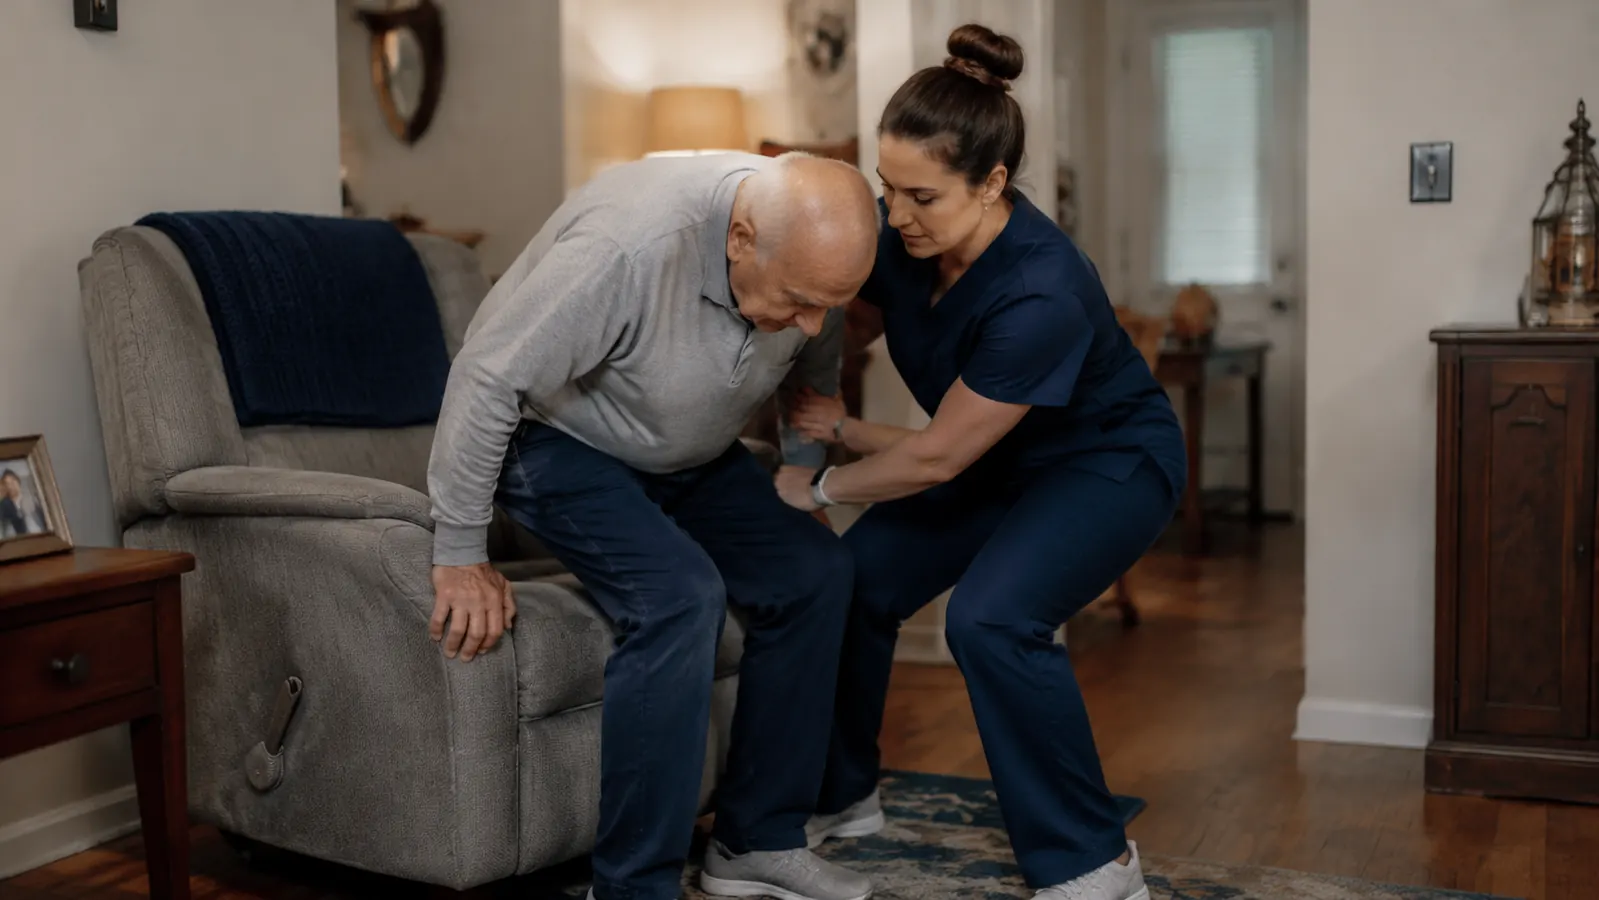
Step 4: Position Yourself Close and Cue the Rock Forward
Stand close to the patient, with your leading foot just in front of theirs. Your knees should be slightly bent and your feet about shoulder-width apart. This gives you a stable base. Do not stand off to the side or behind them. You want to be in front and slightly to the dominant side (usually the stronger side) so that if they start to drift, you can catch the weight.
Before you lift, cue the patient to rock forward. Say it plainly: "Lean forward until your nose is over your toes." That forward lean shifts their center of gravity over their feet, which means most of the work of standing comes from their legs rather than from you. A lot of patients are afraid to lean forward because they feel like they will fall. Reassure them that you have the belt and you are not going anywhere. The rock forward is the single biggest thing that makes the transfer easier for everyone.
Step 5: Use the Count-of-Three Rock to Start the Stand
Do not just pull. Use a count of three so that you and the patient are moving together. Say: "On three, we are going to rock forward and stand. One, two, three." On three, the patient rocks forward and pushes down through their feet, and you guide upward with your underhand grip on the belt, keeping your own back straight and pushing through your legs, not your waist. You are not pulling the person up. You are stabilizing them while they stand.
The rocking motion serves two purposes. First, it builds momentum that makes the transition from sitting to standing physically easier, the same way you naturally rock a little before you get up from a low chair yourself. Second, it tells the patient when to push, so they are not passive weight. When the patient is actively participating, the transfer is safer for both of you.
The Most Important Rule: Bend at the Knees, Never the Waist
Everything else in this guide is technique. This is physics. When you bend at the waist to assist a transfer, the mechanical disadvantage on your lumbar spine is enormous. A 130-pound patient assisted with a rounded back can put the equivalent of several hundred pounds of compressive force on your lower discs. That is how caregivers end up in the emergency room. I know because I have done it.
Keep your back straight and vertical. Let your knees bend. Your thighs and glutes are the biggest muscles in your body. Use them. Think of a squat rather than a deadlift. Your chest should stay tall and open through the entire transfer. If you find yourself hunching forward, stop, reset, and recheck your foot position. Usually the fix is standing slightly closer to the patient so you do not have to reach.
If the patient is very short or very low in the chair, it is tempting to round forward to get your hands on the belt. Instead, bend your knees more. Go lower through your legs, not your back. It feels awkward the first few times. With practice it becomes automatic.
When to Use the Secondary Safety Loop
The LiftAid belt has a secondary loop stitched at the center back. Most caregivers never use it and never need to. But it is there for specific situations, and knowing when to use it matters.
Use the back loop when you are assisting a patient who is walking and needs guiding, not just standing. If your mother is walking down a hallway and you need to be beside her and slightly behind her to catch a stumble, you can hook two fingers through the back loop and stay close without awkwardly reaching around her front. It also helps during toilet transfers when standing face-to-face is not practical and you need to guide from behind and to the side. Grip the back loop from underneath the same way you would the side loops.
Do not use the back loop as your primary grip during a full chair-to-standing transfer. The geometry is wrong for that motion. Use the side loops for standing transfers and the back loop for walking assist or directional guiding.
What to Do If the Patient Starts to Fall
If you feel the person going down, do not try to hold them up. That is the instinct and it is wrong. Trying to hold dead weight upright when the fall has already started is how you tear your rotator cuff and how your patient hits the floor hard. Instead: widen your stance, lower yourself down with them, and guide the fall to the floor. Use the belt to control the descent, not to stop it. A controlled slide to the floor is almost never a serious injury. A hard stop half-way down often is.
Once they are on the floor, stay calm. Check for injury. Do not try to lift them back up by yourself. Call for help, use a floor lift if you have one, or contact emergency services if needed. Getting someone up from the floor safely is a separate skill, and trying to do it alone without the right equipment is one of the top causes of caregiver injury. The gait belt can help guide them to a chair once you have them to a kneeling position, but only if they can bear some of their own weight.
What Else Helps
A gait belt is one tool. It works best alongside other equipment that makes the starting and ending positions easier. A power lift recliner removes the hardest part of the transfer entirely for chair-to-standing moves by doing the mechanical lifting for you. The LiftAid belt becomes most useful for the transfer from bed to wheelchair, from wheelchair to toilet, or from a standard dining chair to standing, where you do not have a power assist.
Non-slip footwear on both the patient and the caregiver makes a real difference. Socks on tile floors or hardwood floors are one of the most common things I see in caregiver-injury stories. Both people should be in shoes or non-slip slippers for every transfer. If your parent insists on bare feet, grippy hospital-style socks are better than nothing.
Finally, practice the count-of-three and the lean-forward cue when stakes are low. Do it at the beginning of the day when everyone is rested and there is no urgency. The transfer technique gets ingrained in both of you faster than you expect, and after a couple of weeks it starts to feel like a coordinated dance rather than a controlled emergency.
The LiftAid belt is the one I use. Metal buckle, side loops, back loop, 60 inches. It works.
A lot of caregivers do not buy one until after they hurt their back. You do not have to wait that long. Check today's price on Amazon and get one in the house before you need it.
Amazon Check Today's Price on Amazon →