
My father-in-law Donald came home from the hospital with a rollator walker and a discharge sheet that said 'adjust handles to proper height.' That was the full instruction. Nobody showed him what proper height looked like, nobody explained the brakes, and nobody told him the seat had to be checked separately from the handles. He used the thing for two weeks at the wrong height and his back started hurting worse than before the fall that put him in the hospital in the first place. That is when I sat down with the walker, figured out every adjustment it had, and wrote down what I found. This is that writeup.
We use the Drive Medical rollator with Donald. It is one of the most common four-wheel walkers you will find on Amazon, with 7.5-inch wheels, cable-activated loop brakes, a padded seat, and a removable basket. Almost every adjustment covered here applies to other rollators too, but the exact hardware matches the Drive Medical model. If you are looking at this walker and wondering whether it is worth setting up correctly, the short answer is yes. A properly adjusted rollator is genuinely different from one that is thrown together out of the box.
Setting up the Drive Medical rollator before your parent takes a single step
The Drive Medical rollator is one of the highest-rated walkers on Amazon, with 4.6 stars from over 50,000 buyers. Proper setup takes about 15 minutes and makes a real difference in comfort, posture, and safety.
Amazon Check Today's Price on Amazon →Step 1: Measure Handle Height Using the Wrist-Crease Rule
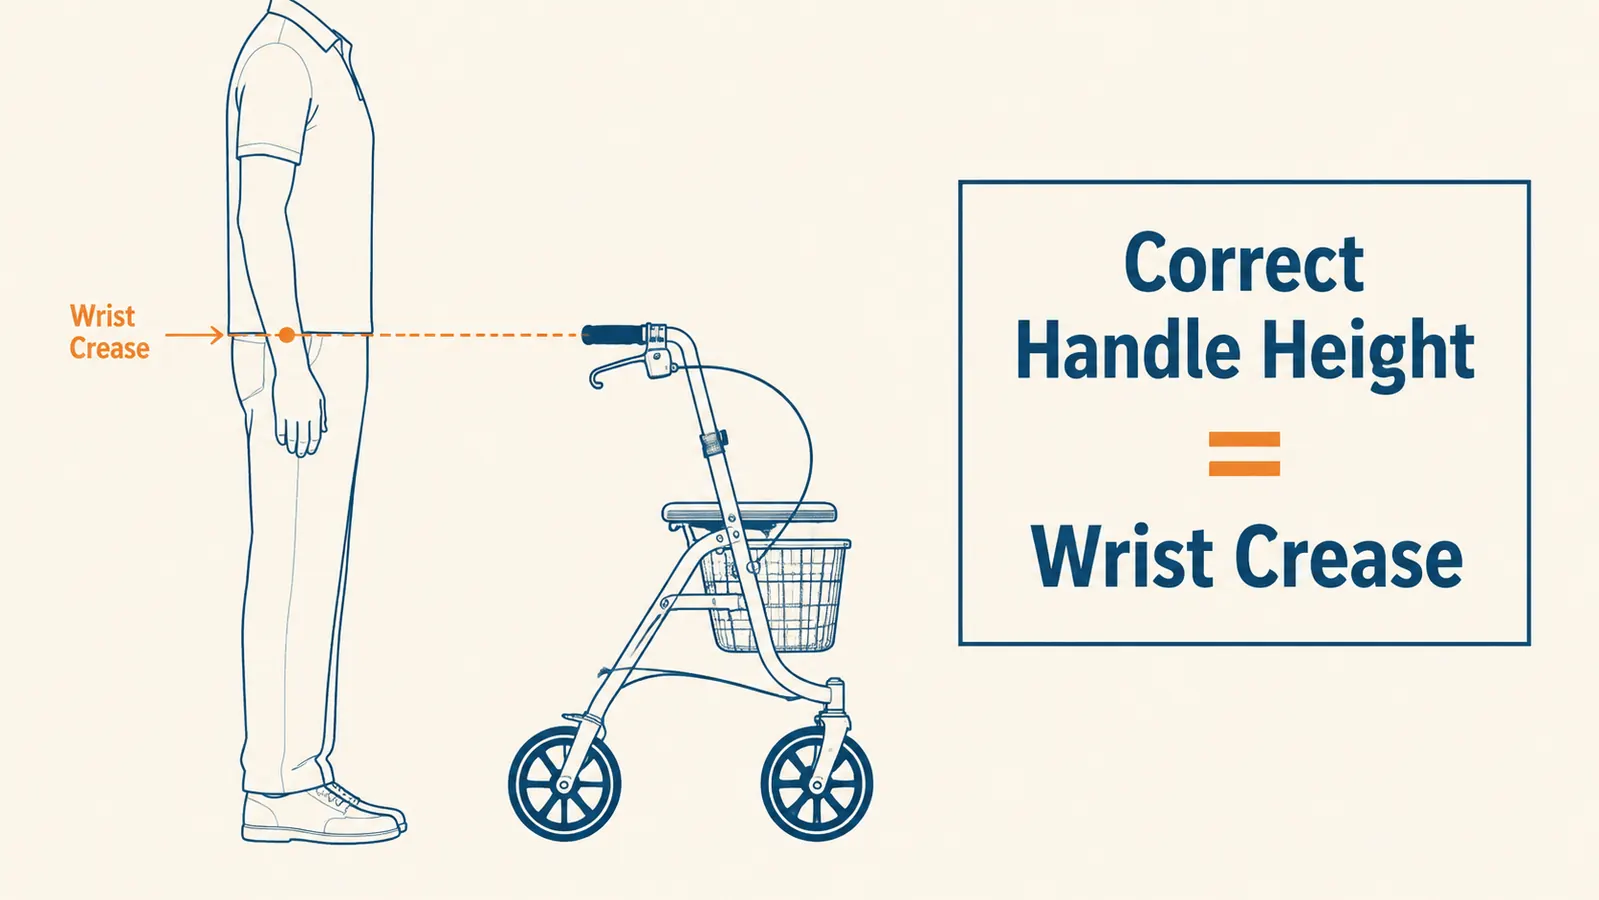
This is the adjustment that matters most and the one most people skip. Have the person stand straight, shoes on, arms hanging relaxed at their sides. Look at where their wrist crease falls, the crease on the inside of the wrist at the base of the palm. That is where the top of the handle grip should land when they are standing next to the walker. Not the thumb knuckle. Not the elbow. The wrist crease.
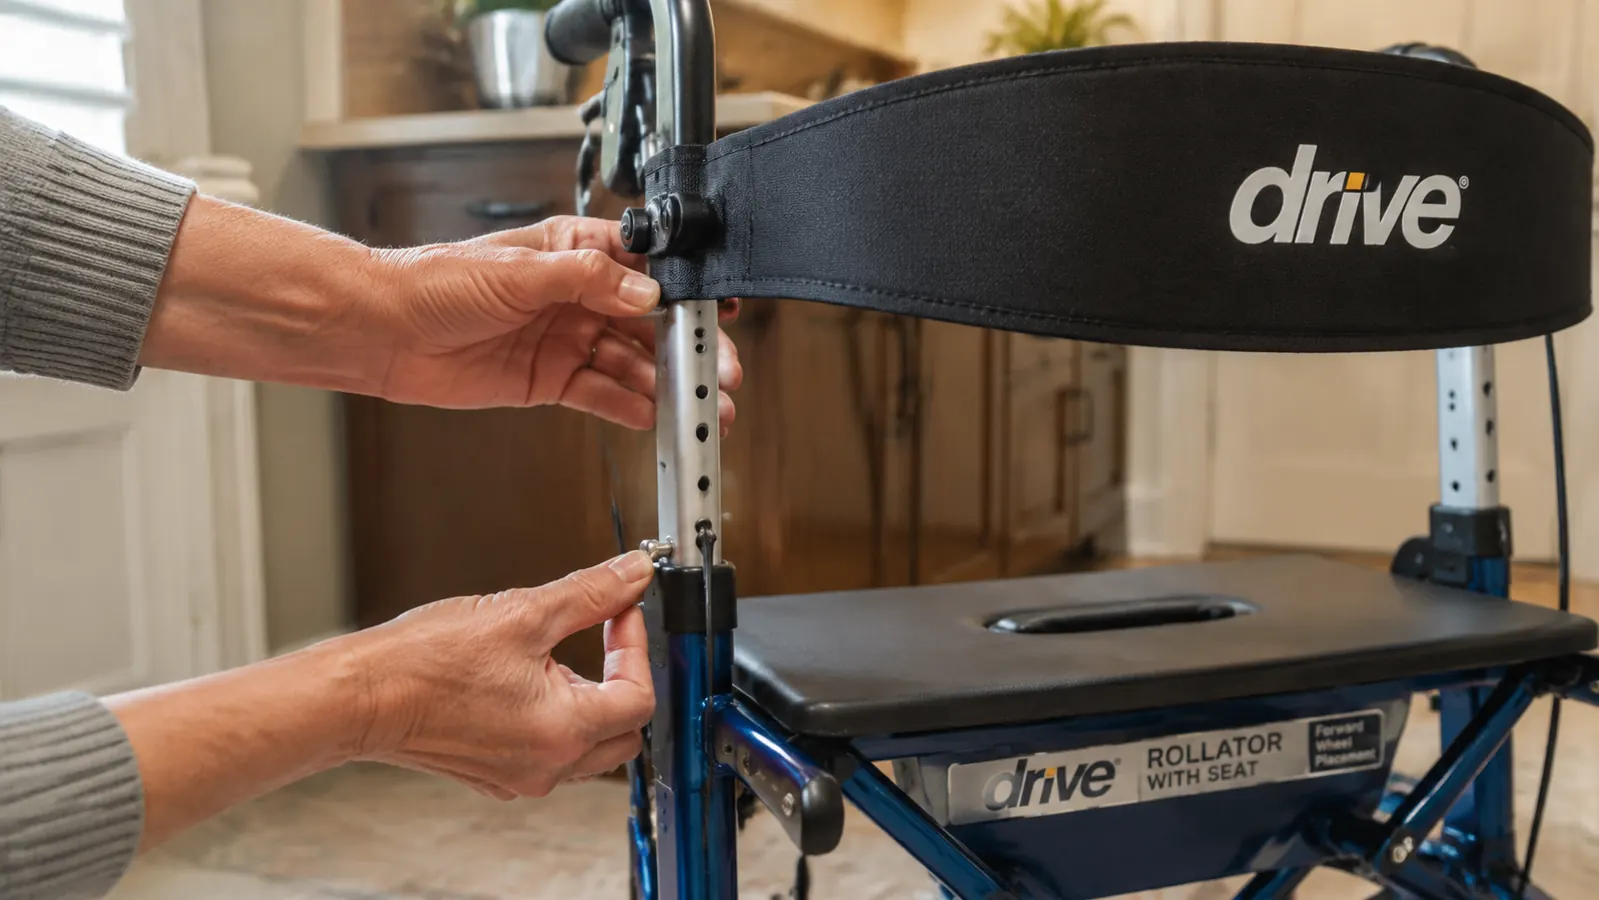
On the Drive Medical rollator, each handle post has a push-button quick-release pin. Push the button in, slide the post up or down until the handle lines up with the wrist crease, and release. You should hear or feel the pin click into a hole. Give it a firm tug before they put any weight on it. The posts have holes spaced about an inch apart, so you can get close even if the perfect height falls between holes. If it is between holes, err on the side of slightly higher rather than lower. Too low causes the person to hunch forward; too high forces them to shrug their shoulders. Either one leads to pain within a few days.
Do both sides. It sounds obvious, but people often adjust one handle and forget the other. Stand behind the walker after adjusting and sight across the tops of both handles to confirm they are even. An uneven walker is a tripping hazard.
Step 2: Check the Brake Cable Tension
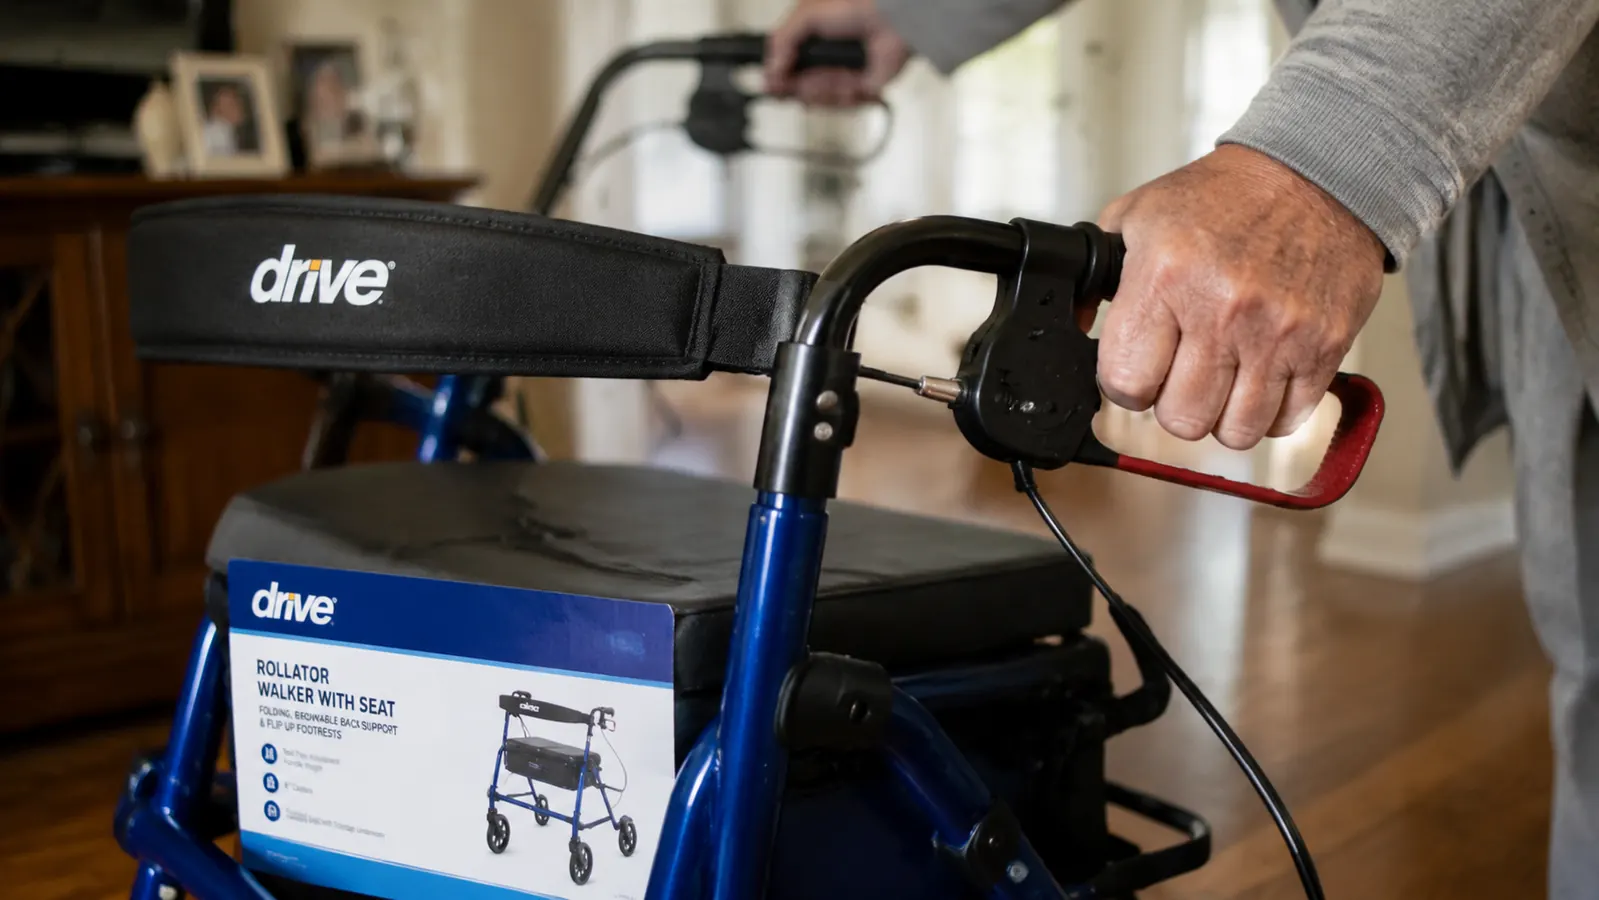
The Drive Medical rollator uses loop brakes, the kind where you squeeze the handle to slow down and push down or lock the lever to park. The brakes come from the factory with reasonable tension, but after shipping and assembly they are worth checking before any use. Squeeze each brake lever from a full grip to about halfway. You should feel definite resistance within that first half of squeeze travel. If the lever travels most of the way to the handle before you feel the cable bite, the tension is too loose.
To tighten, look at the barrel adjuster where the cable housing meets the brake lever mechanism. It is a small threaded cylinder, usually silver, that sits right at the brake lever on each handle. Turn it counterclockwise a few turns to lengthen the housing and take up slack in the cable. Test the lever again. Repeat until you feel solid resistance within the first inch of lever travel. If the barrel adjuster is already fully extended and the brakes still feel soft, the cable itself may have stretched and needs to be repositioned at the clamp near the wheel. That is a five-minute job but it does require a small screwdriver and a few minutes on your knees looking at the rear of the frame.
The parking brake function, pushing the lever down rather than squeezing it, should hold the walker firmly in place when they sit on the seat. Test this by sitting your full weight on the seat with both parking brakes locked. The walker should not roll. If it rolls even an inch, keep adjusting before anyone else sits on it.
Step 3: Set the Seat Height for Safe Sitting
The seat on the Drive Medical rollator adjusts independently from the handles, though many people do not realize this. The seat height matters when the person plans to use the seat during walks, which is one of the main reasons to choose a rollator over a standard walker. A seat that is too low forces a hard bend in the knees and makes it hard to stand back up. A seat that is too high means their feet do not rest flat on the ground when seated, which makes it feel unstable.
The target seat height is the same as you would use for any chair: the person should be able to sit with hips slightly above knee level, feet flat, and push straight up without straining. For most people this puts the seat somewhere between 17 and 21 inches off the floor. Measure the height of a chair they already find comfortable to stand up from. Set the rollator seat to match that height as closely as the adjustment holes allow. The rear legs on the Drive Medical model adjust just like the handles, with the same push-button pin system. Check both rear legs for an even seat.
A rollator set at the right handle height, with properly tensioned brakes and a seat they can stand up from without struggling, is a completely different piece of equipment than one pulled out of the box and handed over as-is.
Step 4: Attach and Load the Basket Correctly
The Drive Medical rollator includes a wire basket that hangs from two hooks on the front crossbar under the seat. The basket is one of the best features of this walker because it frees up both hands during a walk, something a cane or standard walker cannot do. Attaching it takes about ten seconds: slip the two S-hooks over the front frame rail, one on each side, and press down until they sit flush. Give the basket a few tugs to confirm it is not going to shift.
Keep basket weight reasonable. The Drive Medical rollator handles 350 pounds of user weight, but the basket is not rated for heavy loads. Groceries, a water bottle, a small bag, a folded jacket, all fine. Do not hang a full 12-pack of canned goods from it. Heavy loads in the front basket shift the center of gravity forward and make the walker less stable, especially on slopes. If the person regularly needs to carry more than a few pounds, consider a backpack worn over the walker frame instead.
Also confirm the basket does not swing forward and contact the wheels during turns. With the hooks seated correctly it should clear the wheels easily, but if a hook is off-center the basket can catch the front wheel during a tight turn and pitch the walker sideways. A quick test: push the walker through a sharp left and right turn and watch the basket. It should stay put.

Step 5: Practice the Folding Mechanism Before You Need It
The Drive Medical rollator folds flat for transport and storage by pulling up on a strap or handle on the seat platform. Lift the seat upward and the two side rails hinge inward, collapsing the walker to roughly four inches wide. It is a solid mechanism, but it takes a few practice runs to do smoothly, especially if you have any stiffness in your hands.
To unfold, set the walker on its wheels and push the top frame down or let it drop open. It will click into its open position. Before the first fold-and-unfold in a parking lot or at a doctor's office, do it in the driveway at home five or six times. You want the motion to be automatic so you are not wrestling with it while your parent stands on the sidewalk in the heat or the rain. Remove the basket before folding if you want it to lie completely flat. With the basket attached it still folds, but it sits less flat in the trunk and can put stress on the basket hooks over time.
When loading into a car trunk, stand the folded walker on its rear wheels rather than laying it on its side. It fits in most standard sedan trunks this way without shifting during the drive. A folded walker sliding around in a trunk is a rattling noise and a potential scratch on the car interior. A bungee cord around the handle posts keeps it upright if the trunk is otherwise empty.
Ongoing Maintenance: What to Check Every Few Weeks
A rollator is a mechanical device and it needs occasional attention. This does not mean a lot of work. Once a month is enough if the walker gets daily use outdoors. Here is the short list.
Wheels: spin each wheel by hand and listen for grinding or feel for wobble. The Drive Medical rollator uses plastic wheels with a simple bolt through the center. If a wheel wobbles, the bolt has come loose. A wrench tightens it in thirty seconds. If the wheel grinds, something is caught in the axle, usually a thread or piece of debris. Remove it and the grinding stops.
Brake cables: tug the cable where it runs along the frame and confirm nothing is frayed or kinked. Look at where the cable housing enters the brake lever and where it terminates at the wheel clamp. Any fraying means the cable needs replacing before the next use. Drive Medical replacement cables are widely available and are a ten-dollar fix.
Frame joints: check the height adjustment pins on all four posts. They should be fully seated in their holes. A pin that is only partially engaged can slip under load. Also check the front crossbar connection points where the frame halves meet. These are usually nut-and-bolt connections. Snug them if they have loosened.
Seat pad: the Drive Medical rollator seat is a hard plastic platform with a thin cover. After heavy outdoor use in sun and rain, the cover can crack. It is a cosmetic issue, not a structural one, but a cracked seat edge can catch clothing. A few dollars of athletic tape over the edge solves it until a replacement cover arrives.
Glide tips: the two rear legs have rubber tips that contact the ground when the person sits or parks. Pull them off and check the inside channel for debris. Cracked or flattened tips should be replaced. They are included as spares in the Drive Medical box and are available from any medical supply retailer.
What Else Helps With Rollator Comfort
Beyond the mechanical setup, a few practical items improve daily use. Handlebar covers or foam grips reduce hand fatigue on long walks, especially for people with arthritis. They slip over the existing grip and are about five dollars. A cup holder that clips to the frame is a worthwhile add-on for anyone who walks outdoors and needs water nearby. And if the person uses the rollator in rain or on wet floors, replacing the standard wheels with all-terrain or non-slip versions reduces the chance of the walker skidding on smooth tile.
Posture matters as much as any mechanical adjustment. Even with the handles at the right height, some people develop a habit of leaning forward on the handles rather than walking upright with hands lightly resting on them. If you see the person hunching over the walker, a gentle reminder is worth more than another adjustment. The walker is supposed to steady them, not carry them. Walking with a slight forward lean is normal. Folding nearly in half over the handles is not.
If you want the full picture on whether this specific walker is worth buying before you set one up, I covered 18 months of daily outdoor use in a separate review. That piece includes what the brakes and wheels look like after sustained use on pavement and grass, and whether the seat holds up at the low end of the price range. The link is at the bottom of this page.
The Drive Medical rollator is already set up to adjust correctly. Here is where to get it.
4.6 stars from more than 50,000 buyers. Adjustable handles, loop brakes, fold-flat frame, removable basket, 350-lb capacity. Once you run through these adjustments it takes about 15 minutes total and it is ready for daily use.
Amazon Check Today's Price on Amazon →